# 3.1.0 Getting Ready

### **Connecting the AI Camera to a PC**

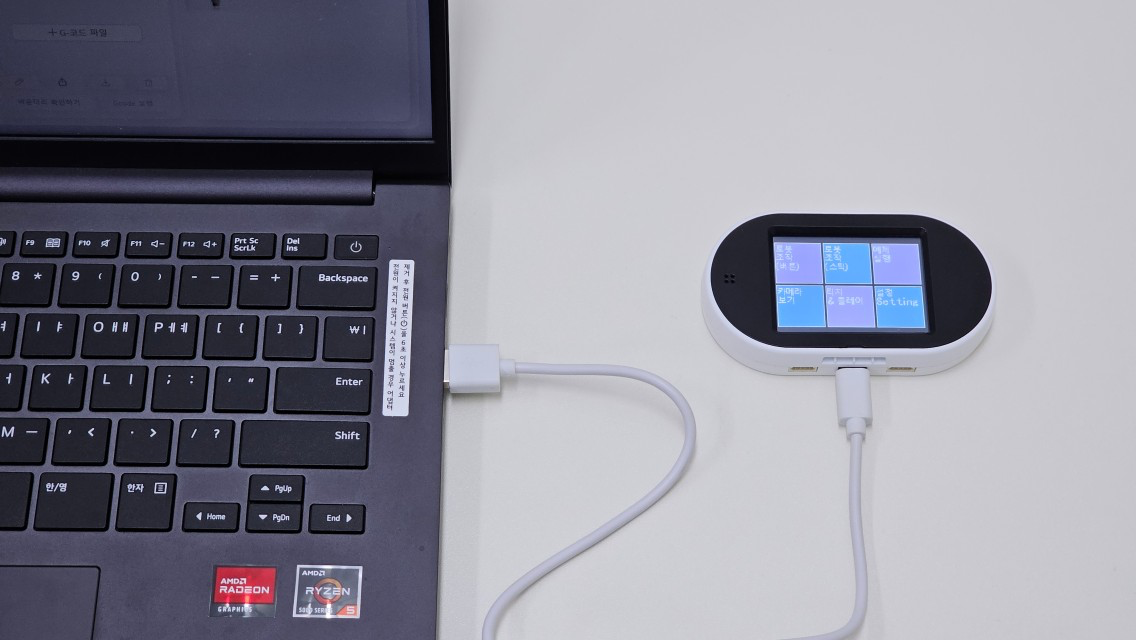
* Connect the **AI Camera’s USB-C port** to a **PC** as shown below.

<figure><img src="https://content.gitbook.com/content/auX5vWu2xzL5b4Cvif21/blobs/V5ICJjvgnvihCwMuCteH/image.png" alt=""><figcaption><p><strong>The AI Camera Connected to the PC</strong></p></figcaption></figure>

***

### **Connecting the AI Camera in the \[Code] Tab**

To **recognize and connect** the AI Camera, let's create a **Block Coding project** in the **\[Code]** tab.

1. After **connecting the AI Camera** to the **PC**, it will be **recognized** in **HUENIT LAB - \[Code]** tab.

<figure><img src="https://1881188396-files.gitbook.io/~/files/v0/b/gitbook-x-prod.appspot.com/o/spaces%2FauX5vWu2xzL5b4Cvif21%2Fuploads%2F4seyl9m2FNbSRwE1GN0k%2Fimage.png?alt=media&#x26;token=87bb1d96-7fee-41ee-b466-ad58889b8237" alt=""><figcaption></figcaption></figure>

2. Click the **\[Connect]** button in **HUENIT LAB** to establish the connection.

   💡 **Note:**

   * If the **AI Camera is not connected via USB**, the **\[Connect]** button will **not** appear in **HUENIT LAB**.

<figure><img src="https://1881188396-files.gitbook.io/~/files/v0/b/gitbook-x-prod.appspot.com/o/spaces%2FauX5vWu2xzL5b4Cvif21%2Fuploads%2F516nDICgFJJb7I3nAnJE%2Fimage.png?alt=media&#x26;token=60dbcf8e-5d97-4f5e-92e4-2d1184add542" alt="" width="375"><figcaption></figcaption></figure>

📌 **Once connected successfully, the necessary coding buttons will be activated.**

<figure><img src="https://1881188396-files.gitbook.io/~/files/v0/b/gitbook-x-prod.appspot.com/o/spaces%2FauX5vWu2xzL5b4Cvif21%2Fuploads%2FEecleQLizTw1s3KIHCPb%2Fimage.png?alt=media&#x26;token=1b1cd936-df2e-45ca-adb6-5090c60d708f" alt="" width="375"><figcaption></figcaption></figure>

***

### **1. Running Code**

#### **Method 1: Running Code While Connected to a PC**

* To check the **output of the completed code**, click the **\[Live]** button.

<figure><img src="https://1881188396-files.gitbook.io/~/files/v0/b/gitbook-x-prod.appspot.com/o/spaces%2FauX5vWu2xzL5b4Cvif21%2Fuploads%2FU8JSPJH7475ttOrAbpUY%2Fimage.png?alt=media&#x26;token=2c64402a-1499-4a7a-abd7-bda2e3aefc9c" alt="" width="375"><figcaption></figcaption></figure>

* To **stop the Live code execution**, click the **\[STOP]** button.

<figure><img src="https://1881188396-files.gitbook.io/~/files/v0/b/gitbook-x-prod.appspot.com/o/spaces%2FauX5vWu2xzL5b4Cvif21%2Fuploads%2FfSSK9ZZWuS16azRU22be%2Fimage.png?alt=media&#x26;token=f311afa3-3d22-456c-8d46-2e4c529bcf28" alt="" width="375"><figcaption></figcaption></figure>

***

#### Method 2: Uploading Code to the AI Camera for Standalone Execution

{% hint style="info" %}
This method is mainly used when running code while the **AI Camera is connected to a robotic arm**.\
Since the AI Camera **cannot be connected to both a PC and a robotic arm at the same time**, follow these steps:
{% endhint %}

1. Click the **\[Upload]** button to **save the completed code** onto the **HUENIT AI Camera**.
   * **⚠ Note:** Clicking the **Upload** button **stores the code** in the AI Camera but **does not execute it immediately** like the **Live** button.

<figure><img src="https://1881188396-files.gitbook.io/~/files/v0/b/gitbook-x-prod.appspot.com/o/spaces%2FauX5vWu2xzL5b4Cvif21%2Fuploads%2FdQhaTBWbrrKeUqEECBkz%2Fimage.png?alt=media&#x26;token=818a5be3-8d59-4030-9a95-9f7cdf143acd" alt="" width="375"><figcaption></figcaption></figure>

2. To execute the **uploaded code**, **press and hold the AI Camera’s button for 2 seconds**.

<figure><img src="https://1881188396-files.gitbook.io/~/files/v0/b/gitbook-x-prod.appspot.com/o/spaces%2FauX5vWu2xzL5b4Cvif21%2Fuploads%2FdbykonlfIqAl8uHn5cuf%2Fimage.png?alt=media&#x26;token=2e69f402-29f1-48f6-9351-155c7676360b" alt=""><figcaption></figcaption></figure>

3. To return to the **initial HUENIT OS home screen**, **press the AI Camera’s power (reset) button**.

<figure><img src="https://1881188396-files.gitbook.io/~/files/v0/b/gitbook-x-prod.appspot.com/o/spaces%2FauX5vWu2xzL5b4Cvif21%2Fuploads%2F2cR1vEIHQqLlcusdlUxq%2Fimage.png?alt=media&#x26;token=b8acdb41-d68b-4886-87b1-6723c6435b20" alt=""><figcaption></figcaption></figure>

***

### 2. Resetting the AI Camera

* If an **existing code** is already stored on the AI Camera and needs to be cleared, press the **reset button** to **reset the AI Camera**.

<figure><img src="https://1881188396-files.gitbook.io/~/files/v0/b/gitbook-x-prod.appspot.com/o/spaces%2FauX5vWu2xzL5b4Cvif21%2Fuploads%2F8nhbekR59uAUGJZZN6aD%2Fimage.png?alt=media&#x26;token=a45eceda-87d0-4c9a-a90d-94ce75d00c15" alt="" width="375"><figcaption></figcaption></figure>
